Mandibular Advancement Devices for Snoring and Sleep Apnea
If you have been diagnosed with obstructive sleep apnea, it means that your breathing is disrupted during sleep. These disruptions can occur in two ways. An apnea happens when breathing stops completely for 10 seconds or longer. A hypopnea occurs when breathing becomes shallow enough to cause a drop in blood oxygen levels for a certain period of time. Many patients experience a combination of both.
During a sleep study, these breathing events are measured using a score called the Apnea–Hypopnea Index (AHI). The AHI represents the average number of apneas and hypopneas per hour during sleep. An AHI of 5 to 14 events per hour is considered mild obstructive sleep apnea. 15 to 29 events per hour is considered moderate, and 30 or more events per hour—which means an event occurs at least every two minutes—is considered severe obstructive sleep apnea.
The gold standard treatment for obstructive sleep apnea is CPAP (continuous positive airway pressure). A CPAP machine delivers a steady flow of air through a mask worn over the nose or face to keep the airway open during sleep. While CPAP is highly effective when used consistently, long-term compliance is only about 50%, and many patients find it uncomfortable or inconvenient, especially when traveling.
For patients with mild to moderate obstructive sleep apnea, a mandibular advancement device may be an effective alternative. This option may be appropriate if you have healthy teeth and gums, good jawbone support, and normal jaw range of motion, including the ability to move your lower jaw forward an adequate amount. These factors are carefully evaluated during your examination with Dr. Hirschinger to determine whether this type of treatment is appropriate for you.
Am I a Candidate for a Mandibular Advancement Device?
To determine whether a mandibular advancement device is likely to help with your snoring and/or obstructive sleep apnea, a few key factors are important. First, your teeth and gums need to be healthy. This means you’ve had a recent dental exam, do not currently need dental treatment, and have healthy gums and jawbone to support your teeth. Dr. Hirschinger also recommends that any jaw or TMJ pain be significantly improved—or fully resolved—before beginning treatment.
Another important factor is your ability to move your lower jaw forward. Most people can protrude their jaw at least 8 millimeters, which is the minimum needed for this type of appliance. This measurement is taken during your new patient exam with Dr. Hirschinger.
You can also try a simple at-home test to see whether jaw advancement improves your breathing. First, gently bring your teeth together, close your lips, and try to snore. Then slightly separate your teeth (about the width of a finger), close your lips, move your lower jaw forward a bit, and try again. An even better method is to place one cotton roll on each side between your back teeth, bite lightly until you feel the cotton rolls, close your lips, and gently move your jaw forward. If you notice that breathing feels easier and snoring is reduced or stops, a mandibular advancement device is likely to be helpful for you.

Separate your teeth using one cotton roll on your back teeth on both sides, or about the height of a finger. Move your jaw forward a little bit.
Then close your lips and try to snore. Your snoring should be reduced, and breathing should be easier. If it isn’t, move your jaw a little farther forward and try again.
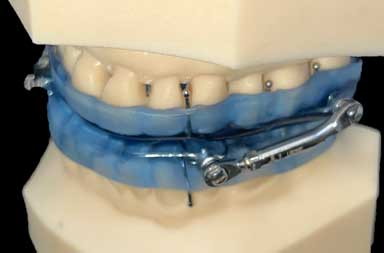
Currently Recommended Prosomnus
Previously Recommended Herbst
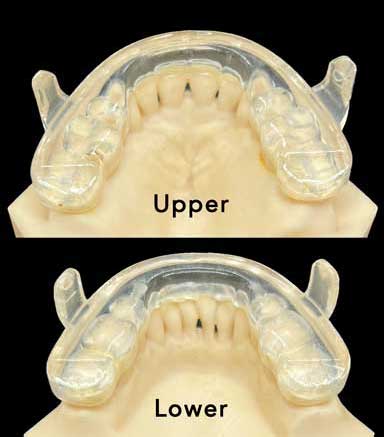
This is the Prosomnus appliance. You can see the back of the front teeth on the upper and lower arches. This means the tongue has room to rest against the back of these teeth, which increases the effectiveness of the appliance.

This is the Herbst appliance. You can see that the appliance covers the back of the front teeth on both the upper and lower arches. This forces the tongue back, reducing the effectiveness of the appliance.

This is the view from the tongue when the Prosomnus appliances are being worn. You can see that the appliances only cover a little bit of the back of the teeth. This allows more room for the tongue to sit forward.
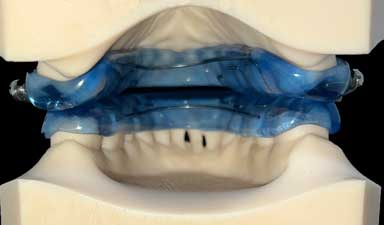
This is the view from the tongue when the Herbst appliance is worn. You can see the appliance covers the back of the upper and lower teeth, which pushes the tongue backwards. This removes some of the effectiveness of the appliance.
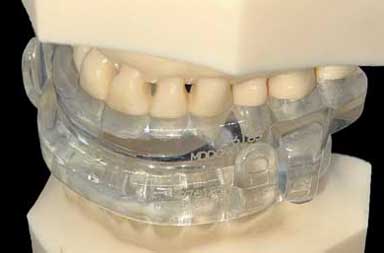
This is a view of the side of the Prosomonus appliance. The bars, which you can clearly see in the top photo, meet to hold the lower jaw forward, which opens the airway. This appliance is thicker on the lip side than on the tongue side, which is preferred since the tongue side needs room for the tongue.
This is a view of the side of the Herbst appliance. You can see the hardware that is required to connect the upper and lower appliances. Most patients adapted to the hardware, but some did not, which is one of the reasons Dr. Hirschinger now uses appliances without any hardware.
What Needs to be Done After Wearing a Mandibular Advancement Device?
Every morning, you need to stretch your lateral pterygoid muscles, which are the muscle that enables you to move your jaw forward and side-to-side. This muscle is held forward by the appliance when you are sleeping, so you need to stretch it back in the morning after removing your mandibular advancement device. Dr. Hirschinger will give you a bite wafer, which one of his patients called a “chew toy,” to stretch the lateral pterygoid muscles. You place your upper front four teeth on the wafer, squeeze your teeth backwards for 10 seconds, rest for a few seconds, and repeat this 2 more times. Then check your bite. It should feel the same as it did before you started wearing the mandibular advancement device. If it doesn’t feel normal, repeat these steps for another three repetitions. Some patients need to repeat this up to six times each morning until their bite feels normal. This is only done in the morning.
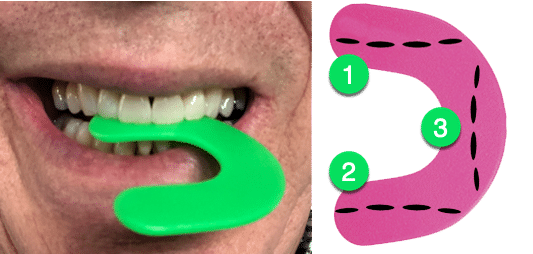
Squeeze and hold the wafer for 10 seconds. Rest and repeat two more times.
The wafer should dip down when used properly. Repeat this until your bite returns to normal.
Once the bite wafer starts to thin, rotate it to a different position as shown in the image above.